
Never strung your racKet before? What about your racQUet? No matter how you spell it, tennis racquet/racket strings break fairly frequently – especially if you’re getting ample playing time out of them. There’s no time like the present to learn the ABCs of racquet stringing.
The frame is designed to last for ages, but the strings go through a lot of pressure and stress and should be replaced periodically.
This guide will cover details about string tension, string thickness, the types of string to buy, how to string your racquet, and many other string subjects in between!
I’m very interested in tennis so to me it’s pretty fascinating stuff. If that’s you as well, keep reading!
Contents
What Tension Should Your Tennis Racket Be?

All rackets will provide you with manufacturer guidelines for the recommended tension range. Typically 55-65 lbs of tension is standard for most rackets made today.
Junior rackets have entirely different requirements, so if you have kids (with junior rackets), they’ll have different tension ranges.
There are plenty of professional tennis players who use higher tension as well, but 55-65 lbs is the standard range.
Federer, for example, has his rackets strung at 55-60 lbs. He also uses a hybrid string set up, but we’ll get to that a little later.
He’s a world-class tennis player who knows exactly what he wants from his rackets and string. That tension range allows him to play his best.
You’ll find your own desired tension after playing a for a while.
If you have the option, testing out both higher tension and lower tension will allow you to get a feel for what works best for you. It’s different for everyone.
What is the Best String Tension for Power?

The lower the tension, the more power you’re going to have.
When a racket is strung at a lower tension, the string bed is softer and there’s more give to the string bed. Using Isaac Newton’s Third Law of Motion, “every action has an equal and opposite reaction”, when the strings are loose they act as a trampoline.
Most kids (and many adults) have spent time on a trampoline. When you hit the sweet spot in the middle and sink very low into the trampoline, you can bounce sky high.
If you find yourself closer to the edge of the trampoline, you don’t get as much push from it and don’t bounce as high.
The same premise exists with a tennis racket. The looser the strings, the more power the ball gets as it’s struck.
Comparative Chart for Low Tension and High Tension
| Attribute | Low Tension | High Tension |
|---|---|---|
| Power | Lower tension creates a trampoline effect in the center of the string surface which effectively mirrors the energy back into the ball. With lower tension, the faster the ball comes at you, the faster you'll be able to send it back. | Power is not the focus with higher string tension. With a higher tension, you're going to hit the ball and have a lower 'oomph' from your efforts. Less power can be a good thing depending on your playing style. |
| Control | Control isn't the goal when stringing at a lower tension. Speed and control don't have to be mutually exclusive. Using a lower tension to achieve more power does not automatically eliminate all control. | Comparatively, you have more control with higher tension. Due to the lack of the trampoline effect, the strings won't propel the ball as quickly so there's more time for directional control. |
| Durability | Rackets strung at lower tension tend to have more durability in the strings. Because the tension isn't as high, the strings aren't under as much pressure when not in use. | You have slightly less string durability when a racket has higher tension. Without any hitting, the racket has higher pressure on the string bed. |
| Arm Impact | If you have tennis elbow or any other arm injury, using lower tension will provide a more forgiving hitting experience. | Your arm will feel more of the impact when strings are strung to the higher end of the tension range. This may be something to consider if you have or are prone to arm injuries. |
| Arm Impact | Personal preference is the name of the game for comfort. Try out lower tension and see how you like it. | Personal preference is the name of the game for comfort. Try out higher tension and see how you like it. |
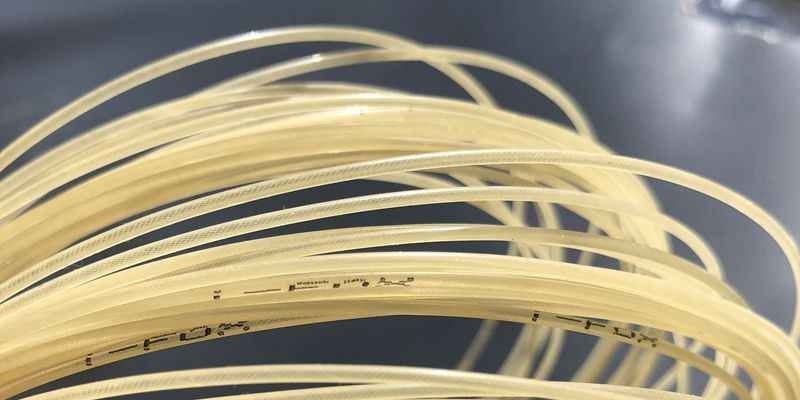
What are Tennis Racquet Strings Made Of?
There are two main categories of string materials – natural gut and synthetic. Both have their own benefits and drawbacks.
It’s worth mentioning that natural gut is preferred by many of the top professional tennis players. Natural gut strings are more expensive so they may not be your top choice.
Natural Gut
Synthetic
Synthetic strings are made out of multiple (synthetic) sources: Nylon, Polyester, Kevlar, etc. Because they’re made of synthetic materials, durability is often increased and costs may be decreased.
Nylon strings are a good all-around type of string. They aren’t fancy but they get the job done. They also tend to be the most cost effective.
When first starting out or when trying different string tensions, you might consider using Nylon so as not to break the bank.
Polyester and Kevlar are very durable. Hard hitters or those who tend to break strings a lot may prefer this type of string.
Just like with rackets and shoes, the type of string you prefer is all about what feels best when you strike the ball.
What is Hybrid Stringing?

Hybrid stringing refers to using two different string types on the mains and the crosses.
An example would be using a synthetic nylon on the mains and natural gut on the crosses. Synthetic string is less expensive and the mains are often the workhorses of the racket.
By combining nylon with natural gut, you increase durability and decrease cost.
Another version of a hybrid stringing pattern would be using 16 gauge string on the mains and 17 gauge string on the crosses. The lower the gauge of the string, the thicker it is and tends to be more durable.
By using thicker string on the mains and thinner gauge on the crosses, you have a little more feel.
Using two different types of string allows the player to create their preferred manner of durability and feel rather than being constrained by choosing a single string type.
Does String Gauge Affect Performance?
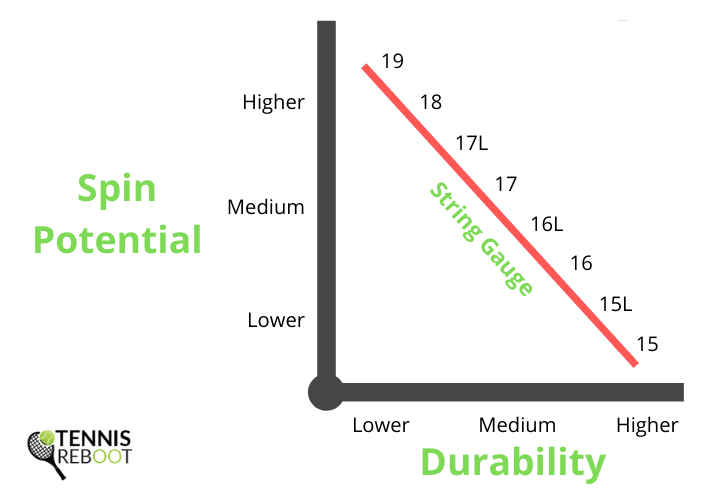
As just referenced, string gauge tells you how thick or thin it is. Gauges run from a size 15 to size 19.
What’s interesting is that the numbering sequence works in reverse order. A gauge of 15 is actually the thickest (1.51 mm to 1.49 mm), while the 19 is the thinnest (1.00 mm to 1.10 mm).
Thinner strings break more quickly, but they provide more feel when striking the ball. A thicker string (15 gauge) will last for a L O N G time, but you may feel like you’re hitting the ball with a 2×4 as you don’t have as much feel.
String tension, string material, string thickness – they’re all about personal preference. If you hit better with thinner strings then it will positively affect your performance.
Everyone has to find their own sweet spot for their equipment.
Racquet Stringing: How To Do It
Below are the step-by-step instructions for how to string a racquet.
Check out this video for an excellent explanation of each step. Once you’ve watched it, come back and read the instructions again and they will make MUCH more sense.
1. Things to Consider Before Starting
2. Find the Right Stringer for the Job

We’ve compiled an entire list of stringers with the pros and cons here.
There are a few factors that go into choosing the right one, so make sure you pick one that best meets your needs (price storage space, portability, etc.).
Two-point systems are good. Six-point systems will cost a little more. Once you’ve gotten your stringer, set it up where you want to do your stringing.
Tabletop machines will work well on a kitchen table or counter while stand machines include everything needed and just need a place to live.
3. Pick a Stringing Method
Just like choosing the kind of string you want to use in the racket, you have to decide on the method you’ll use to do the stringing.
For the sake of this article, we’re using the two string method. This will require tying off the mains when they’re done and tying off the cross string (to a main string) before you can begin them.
4. Measure Your String

When you buy a single set of string, the package tends to come with about 40 feet of it. That’s because 40 feet of string will be enough material to string one racket (not a super oversize head).
If you buy a reel of string, you’ll have to measure out 40 feet of string for each racket. It’s more cost effective to buy string in a reel, but it’s a commitment to knowing you really like that string.
If more than 40 feet of string is needed, the manufacturer will let you know with the other stringing specifications (tension range) are.
Do what you can to uncoil the string as it’s very difficult to work with when it’s all kinked.
When using thinner string (natural gut, 19 gauge), a kink could cause it to break while you’re in the middle of the string job and that’s a waste of your time and money as you won’t be able to finish.
Once you’ve got your 40 feet of string, cut it in half so 20 feet can be used for the mains and 20 feet can be used for the crosses.
5. Cut Out the Old Strings
Out with the old, in with the new, right? Whether the strings in your racket have broken or not, you’ll need to cut them out.
Cut them out in a circular pattern starting in the middle and going out to each corner one at a time.
Alternate between cutting mains and crosses in a circular fashion. This will allow you to let out the tension in the racket more evenly.
The guy in the video above is a little chatty, but he demonstrates what to do. The meat of the info starts around the 2-minute mark.
Once all the strings are out, look at the grommets to determine if any need to be replaced. They tend to last for 2-3 years.
6. Mounting the Racket

Tennis stringing machines have mounting racks at different points that are used to keep the racket in place while you string it.
Your racket head size will vary, but that’s why stringers are adjustable to accommodate varying head sizes.
It’s rare to find a stringer that doesn’t have this feature.
This is where the two-point versus six-point debate comes into play. Six-points have more places to lock the racket down for it to be more secure.
Make sure none of the grommet holes are covered by the stringer or any clamps. If they’re covered up, you’ll miss a grommet and will have strung the racket incorrectly. It’ll be uneven but you won’t likely figure it out until you’ve finished.
7. Locate the Starting Point

The main strings run parallel to the handle of the racket and are the direction where stringing begins.
Where you start is based on the construction of your racket.
If the throat of your racket has 6 holes, you’ll start at the throat. If it has 8 holes, you’ll start at the head.
In the picture above, you can (sort of) see that there are three areas where string comes out of the throat. Three areas equates to 6 holes. With this racket, you’d start in the throat.
Starting vertically you’ll pull the string through one grommet and then through the grommet on the opposite side of the racket that matches to it (head and throat).
Make sure to begin the stringing effort with equal string on both sides.
8. Pulling the Main Strings

Once you have the two main strings threaded, you’ll start to pull the tension on a single main string at a time.
First you have to put a clamp on one string on the side where you started. Place the clamp as close to the grommets/racket frame as possible and pull tension on the other string.
The position of the clamp allows you to keep more of the tension on the string.
Once you’ve pulled the tension, use the second clamp to tighten the string where you just pulled the tension.
Continue in this pattern outward from the middle. While it isn’t necessary to do only one on each side back and forth, don’t ever go more than 2 or 3 to one side. If you do, you’ll be putting your frame under unbalanced pressure.
Once you’re at the end of all the mains, you’ll need to tie off the string since we’re using the two-string pattern.
9. Tie Off the Mains

When all of the mains have been strung and tension pulled, you will need to tie a knot.
Don’t remove any clamps until the knot has been tied or you’ll lose all that tension you just pulled.
Insert one end of the string into the closest possible grommet with space on the outside of the frame and pull the string back inside.
If a grommet is too tight, you might need to use your awl to widen the hole and your pliers to pull the string through the grommet. Don’t be too aggressive or you might damage the grommet.
Bring the end of the string around one side of the main and up the other side of it forming a loop.
Hand pull to tighten. Repeat the process to create a double knot for that end of the mains.
PRO TIP: Until you’re done with the crosses, have tied all your knots, and inspected the racket for errors, don’t cut the extra string. It wouldn’t be fun to redo any stringing, but if you have all your original/excess string, you CAN do so.
10. Starting the Crosses
The direction of stringing now turns to the crosses which are perpendicular to the mains.
You’ll need to change your clamp setup so they can be used for the crosses.
Tie a starting knot using one of the methods shown below. Figure 31 (fishing knot – picture on the right) tends to be the most popular.
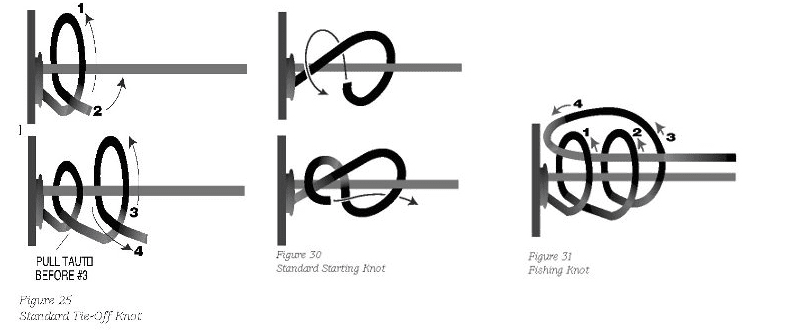
Here are the steps, but make sure you check the video. It makes so much more sense to see it done rather than just reading the words.
- Grab the other half of your 40 feet of string (20 feet).
- Pull it through one of the grommets of a main string at the top of the frame from the outside.
- Pull the string through and wrap it around 3 times.
- Using your other hand, grab the loops that have just been created.
- Bring the end of the string back toward the frame and then back through the loops you just grabbed.
- Pull tight and the loops should tighten flush against the frame.
11. Stringing the Crosses
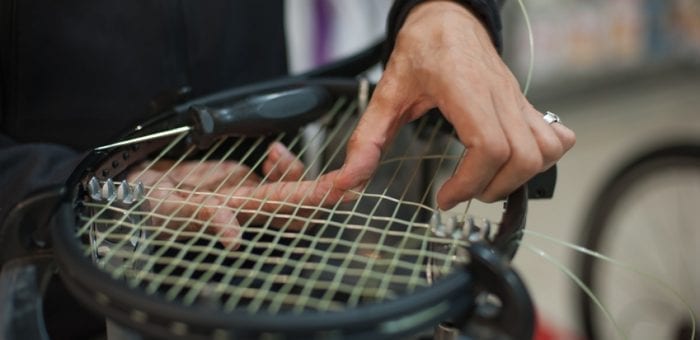
Starting with the closest grommet to you, you’re going to run the string in an “up and over” fashion and then “down and under” all the way across the racket.
Your first string will go on top of the first main, the second will go underneath, and so on until you reach the other side of the racket.
There’s a built-in way to ensure you did it correctly: if you started stringing on top of the main, the last one you do will be underneath it.
When you pull the string through, make sure that you move it around. Keeping it in one place may create notches in the string right off the bat.
Tension can be pulled after each cross or you can do two and then pull tension. It’s user preference on this step, but don’t pull more than three crosses in a single tension pull.
Continue with this pattern until all of the crosses have been completed.
12. Tie Off the Crosses
Now that you have the cross strings all set, it’s time to knot them to keep them in place.
Just like tying off the mains, the same procedure occurs with the crosses. Since the starting knot is already in place, all you have to do is tie off one knot and you’re good to go.
Find the closest grommet that will allow two strings to fit through. If a grommet is too tight, you might need to use your awl to widen the hole and your pliers to pull the string through.
Tie the same knot that was used to finish the mains… bring the end of the string around one side of the main and up the other side of it forming a loop.
Hand pull to tighten. Repeat the process to create a double knot for that end of the crosses.

13. Dismount Racket and Cut Off Excess String
Once you’ve looked at the racket and inspected it for errors, you can cut the extra string.
Clip the extra string from the knots as close as possible, but be careful to not damage the knots themselves.
Gear Up and Game On
The strings you use are important. If you’re not currently doing your own racquet stringing, now you have the knowledge to do so.
If you’re still not comfortable stringing a racquet yourself or feel that springing for a stringer isn’t right for you, definitely find someone you trust to get it done the right way.
Whether you buy your own racquet stringing machine or use a professional, that’s your call.
In the way that an older tennis ball deflates over time and doesn’t work as well, the same is true for your strings. Even if they haven’t broken, they need to be replaced periodically.
Understand the ways to determine if your strings are damaged and consider having your racquet restrung before your next match.
Maintaining your tennis racket(s) will ensure you’re always at the top of your game.